In today's digital world, keyboard proficiency isn't just a nice skill to have—it's essential. Touch-typing is the proven technique that can transform your digital workflow, helping you save hours each week and reduce physical strain.
This comprehensive guide will teach you everything you need to know to master touch-typing and significantly increase your typing speed and accuracy.
What Is Touch-Typing and Why Should You Learn It?
Touch-typing is the ability to type without looking at the keyboard, using muscle memory to locate keys. Unlike "hunt-and-peck" typing, where you search for each key individually, touch-typing engages all ten fingers, each responsible for specific keys on the keyboard.
Key Benefits of Touch-Typing:
- Increased Speed: Most proficient touch-typists achieve 60-80 WPM (words per minute), with experts reaching 100+ WPM, compared to the average 38-40 WPM for non-touch-typists
- Improved Accuracy: Reduces typing errors by up to 50% once mastered
- Enhanced Productivity: Save 20-35% of your computer time by eliminating the constant back-and-forth between screen and keyboard
- Reduced Fatigue: Proper finger positioning minimizes strain on your hands, wrists, and eyes
- Multitasking Capability: Maintain eye contact during meetings while taking notes or reference source material while typing
The Science Behind Effective Typing
Research from cognitive psychology shows that touch-typing allows your brain to focus on content rather than the mechanical process of finding keys. This cognitive offloading enables better composition, problem-solving, and information processing while typing.
Mastering the Keyboard Layout: Optimal Finger Placement
The Home Row Foundation
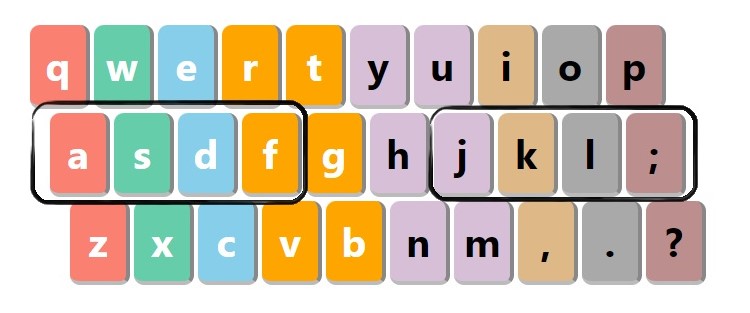
The "home row" is where your fingers should always return to between keystrokes:
- Left Hand: A (pinky), S (ring finger), D (middle finger), F (index finger)
- Right Hand: J (index finger), K (middle finger), L (ring finger), ; (pinky)
The small raised bumps on the F and J keys serve as tactile guides to help you position your hands correctly without looking down.
Left Hand Key Assignments
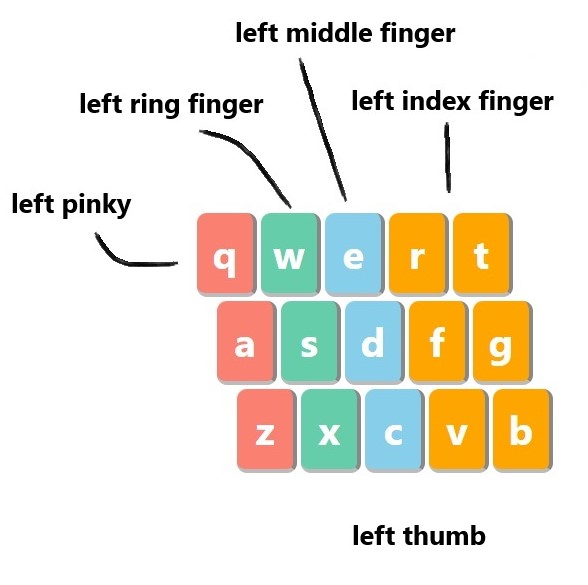
Your left hand fingers are responsible for the following keys:
- Pinky: Q, A, Z, and left Shift
- Ring Finger: W, S, X
- Middle Finger: E, D, C
- Index Finger: R, F, V, T, G, B
Right Hand Key Assignments
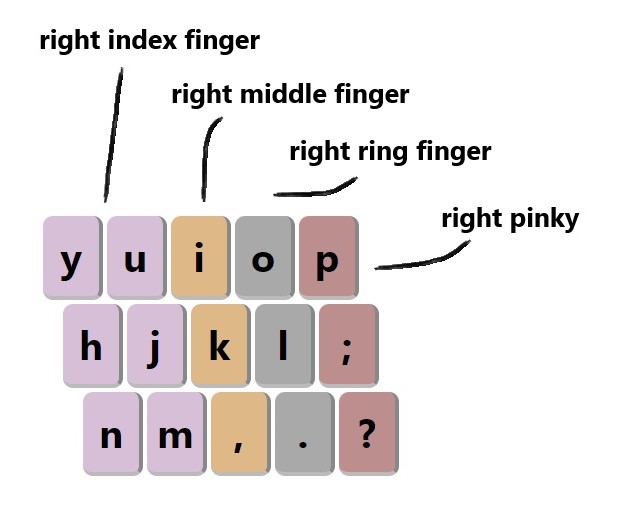
Your right hand fingers cover these keys:
- Index Finger: Y, H, N, U, J, M
- Middle Finger: I, K, ,
- Ring Finger: O, L, .
- Pinky: P, ;, /, [, '], right Shift, Enter
Thumb Responsibilities
Both thumbs are primarily responsible for the spacebar. Most typists use their dominant hand's thumb, but you can alternate thumbs or find what works best for your typing style.
The 5-Step Learning Process to Touch-Typing Mastery
Establish Proper Posture: Sit with feet flat on the floor, back straight, wrists slightly elevated, and elbows at a 90-degree angle.
Memorize the Keyboard Map: Don't skip this crucial step. Spend time intentionally learning which finger presses which key before building speed.
Practice Without Looking: Cover your hands with a typing cloth or use a blank keyboard to break the habit of looking down.
Progressive Skill Building: Master the home row keys first, then gradually incorporate other rows, starting with common letter combinations.
Regular Timed Practice: Schedule 15-20 minute practice sessions daily rather than occasional hour-long sessions.
Common Touch-Typing Mistakes to Avoid
- Improper Finger Positioning: Using incorrect fingers for specific keys creates inefficient movements
- Looking at the Keyboard: Slows down the muscle memory development process
- Inconsistent Hand Position: Allowing hands to drift from the home row position
- Tensing Your Hands: Creates fatigue and slows typing speed
- Skipping the Basics: Trying to type quickly before mastering proper technique
Typing Speed Milestones and Expectations
| Level |
WPM |
Time to Achieve |
Practice Required |
| Beginner |
20-30 |
1-2 weeks |
15 min/day |
| Intermediate |
40-50 |
1-2 months |
20 min/day |
| Proficient |
60-70 |
3-4 months |
30 min/day |
| Advanced |
80-90 |
6-12 months |
Consistent usage |
| Expert |
100+ |
1-2 years |
Regular practice + daily use |
Most people can reach a comfortable 50-60 WPM within 2-3 months of consistent practice, which is sufficient for most professional needs.
Advanced Touch-Typing Techniques
Once you've mastered the basics, consider these techniques to further enhance your typing proficiency:
- Rhythm Typing: Typing to music to develop consistent keystroke timing
- Burst Typing: Alternating between high-speed typing and brief rests
- Shortcut Integration: Incorporating keyboard shortcuts into your touch-typing practice
- Specialized Layouts: Exploring alternative keyboard layouts like Dvorak or Colemak for potential speed improvements
Adapting Touch-Typing Skills to Different Devices
Modern typing extends beyond traditional keyboards. Here's how to adapt your skills:
- Laptop Keyboards: Adjust to the compressed layout while maintaining proper finger positioning
- Mechanical Keyboards: Leverage the tactile feedback for improved accuracy
- Split Ergonomic Keyboards: Position hands at shoulder width for reduced strain
- Tablet Keyboards: Use thumb-typing techniques for virtual keyboards
Conclusion: The Long-Term Value of Touch-Typing
Touch-typing is more than just a practical skill—it's an investment in your digital literacy that pays dividends throughout your career. By removing the cognitive burden of manual typing, you free your mind to focus on content creation, problem-solving, and communication.
Remember that improvement is gradual but consistent. Most people see noticeable progress within 2-3 weeks of regular practice. With patience and persistence, you'll develop a skill that enhances your productivity for life.
Ready to start your touch-typing journey? Set aside 15 minutes today to practice the home row keys, and build from there. Your future, more productive self will thank you.