User Controls, Modules, Fragments, call them what you will but they all do the same job. Reusable snippets of code with their own state and properties that can be inserted in your projects where it is needed. Good code separation leads to more maintainable projects and less clutter to sort through when there is a problem. Android provides us with the Fragment class in order to get the job done. Fragments can be dynamically added and removed at runtime depending on the current layout. We see this frequently with email apps on tablets that show the email selected on the 2nd panel and the listing on the first when flipped to landscape mode.
Creating A Fragment

new fragment class
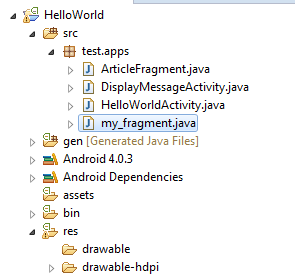
In order to create a Fragment we must override the Fragment class and override any and all life cycle events that we are going to be needing for our implementation. For example, if the parent Activity has it's onPause callback called, it will be called for any Fragments within it. For Fragments, we do need to override the onCreateView callback method in order to specify our layout. Soon as we do that, we are good to go. The code below isn't complete of course, we'll need to define our article_view XML layout.
Just as an example, I created a small layout file with an EditText View and a distinct background color so that it stands out from it's parent Activity.
public class my_fragment extends Fragment {
    @Override
    public View onCreateView(LayoutInflater inflater, ViewGroup container,
        Bundle savedInstanceState) {
        // Inflate the layout for this fragment
        return inflater.inflate(R.layout.article_view, container, false);
    }
}
Adding A Fragment In XML
There are two ways to add a Fragment to an Activity. The first is directly in XML, within your desired Activity layout, which I'll cover now. Just to recap, we should now have our Fragment class set up with the overridden onCreateView method, which inflates the article_view layout, that we just created. We gave the Fragment a different background color from its parent so that it stands out. If we were to run our app now, nothing would happen, as the Fragment needs to be added to whichever Activity we are targeting.
For simplicity sake we'll add this new Fragment to our main default Activity. And we do that by adding and configuring the <fragment> tag in our XML layout file.
<fragment android:name="path.ArticleFragment" // your classes path goes here
              android:id="@+id/article_fragment"
              android:layout_weight="2"
              android:layout_width="0dp"
              android:layout_height="match_parent" />
res/layout/main.xml
<?xml version="1.0" encoding="utf-8"?>
<LinearLayout xmlns:android="http://schemas.android.com/apk/res/android"
    android:layout_width="match_parent"
    android:layout_height="match_parent"
    android:orientation="vertical"
    android:background="#544422" >

    <TextView
        android:id="@+id/textView1"
        android:layout_width="wrap_content"
        android:layout_height="wrap_content"
        android:text="TextView" />
</LinearLayout>
res/layout/article_view.xml
And that's it for getting a fragment onto an activity using XML. If we run it at this point, we should see our lonely TextView appear on our default Activity.
Adding A Fragment At Runtime
We can define our Fragments in XML like we did above, but to offer more flexibility we can also declare and remove Fragments in our code at runtime. In this way, we can add and remove Fragments whenever we wish depending on layout and orientation. The FragmentManager class provides methods that allow you to add, remove, and replace fragments to an activity.
Let's start by removing the <fragment> tag from our main Activity, and instead of having a LinearLayout, we will be replacing it with a FrameLayout. In order to replace one fragment with another, the activity's layout needs an empty FrameLayout that acts as the fragment container. Inside your activity, call getFragmentManager() to get a FragmentManager. Then call beginTransaction() to create a FragmentTransaction and call add() to add a fragment.
You can perform multiple fragment transaction for the activity using the same FragmentTransaction. When you're ready to make the changes, you must call commit().
<?xml version="1.0" encoding="utf-8"?>
<FrameLayout xmlns:android="http://schemas.android.com/apk/res/android"
    android:id="@+id/fragment_container"
    android:layout_width="match_parent"
    android:layout_height="match_parent"
    android:orientation="horizontal"
    android:paddingTop="?android:attr/actionBarSize"
    android:background="#236677" >
</FrameLayout>
res/layout/main.xml
To perform a transaction such as add or remove a fragment, you must use the FragmentManager to create a FragmentTransaction, which provides APIs to add, remove, replace, and perform other fragment transactions.
/** Called when the activity is first created. */
    @Override
    public void onCreate(Bundle savedInstanceState) {
        super.onCreate(savedInstanceState);
        setContentView(R.layout.main);

     // Check that the activity is using the layout version with
        // the fragment_container FrameLayout
        if (findViewById(R.id.fragment_container) != null) {

            // However, if we're being restored from a previous state,
            // then we don't need to do anything and should return or else
            // we could end up with overlapping fragments.
            if (savedInstanceState != null) {
                return;
            }

            // fragment code
            // ========================================================================

            // Create a new Fragment to be placed in the activity layout
            my_fragment firstFragment = new my_fragment ();

            // In case this activity was started with special instructions from an
            // Intent, pass the Intent's extras to the fragment as arguments
            firstFragment.setArguments(getIntent().getExtras());

            // Add the fragment to the 'fragment_container' FrameLayout
            getFragmentManager().beginTransaction()
                    .add(R.id.fragment_container, firstFragment).commit();
        }
    }
Running the example, I get the following. My ActionBar is on top, which I covered here, and my main parent Activity can be seen in the blue-ish color, with the Fragment coming in third with the ugly brownish color that I chose. A simple example, but a complex concept.
Walt is a computer scientist, software engineer, startup founder and previous mentor for a coding bootcamp. He has been creating software for the past 20 years.
Last updated on: